تصميم واجهة Login في Flutter مع شرح كيفية التصميم
واجهة login تقريبا من اكثر الواجهات التي يتم تصميمها في بداية اي لغة برمجة وذلك لانها واجهه بسيطة جدا ومستخدم بشكل كبير ولذلك تجد كثير من الشروحات يقدم تصميم هذة الواجهه في البداية لكي تتعرف على المتغيرات الخاصة باللغه وكيفية التصميم من خلالها , سوف نستعمل صور و زر واضافة اشكال وicons في هذة الواجهه لنحاول ان نجعلها تشمل اغلب المتغيرات .
تعتبر لغة dart مخصصه ل flutter و فلاتر مخصصة لتطوير و صناعة تطبيقات اندرويد او الايفون ونحن نعمل على تقديم شرح لكل من يريد تعلم دارت و برمجة و تطوير التطبيقات ios , android , web او غيرها ويمكنك تحميل حزمة sdk من خلال الانتقال الى الموقع الخاص بهم وعمل download وتثبيته والبدء في انشاء اول app او برنامج لك وسوف نعمل على تقديم دورة لعمل العديد من أفضل التطبيقات وكل شيئ تقريبا حول هذة اللغه وتقديم لكم كتاب في الدارت لتطوير من نفسك حيث يوجد الكثير من كتب development ولكن سوف نقدم لكم افضل كتاب عربي في تعلم الدارت والفلاتر
ما المميز في إطار العمل الخاص بفلاتر
يمكنك عمل تطبيق خاص بك و الـ apps التي يتم كتابها باستخدام language dart تعمل على مختلف المنصات ويمكنك البحث في جوجل عن طريق الانتقال الى google والبحث لماذا بناء التبيطقات بفلاتر ويوجد شركة او العديد من الشركات تهتم ب كيفية العمل بفلاتر وال ui لانه تستطيع من خلال flutter تطوير العديد من التطبيقات بكود واحد بالعربي او الانجليزي لكي تكون البداية لديك قوية ويمكنك الاستعانه بي المصدر ال مستخدم من موقع فلاتر .
تصميم واجهة Login وكتابة الاسم داخل الصورة
لكتابة الاسم داخل الصورة سوف تقوم بعمل صورة واسم وتحيطهم ب stack لكي يمنكك من الكتابة بداخلهم , واسفلهم ضع column وبعد كتابة الاميل والرقم السري واسفلهم النقر على زر login او register وايضا يمكنك عمل المتغيرات بالاعلى كما يظهر TextEditingController وتعطي الاسم للمتغير النصي الذي تريدة بحيث عندما يتم النقر عليه يكون معرف داخل البرنامج ان هذا المتغير email على سبيل المثال يشير الى الاميل وهكذا مع اي متغير اخر .
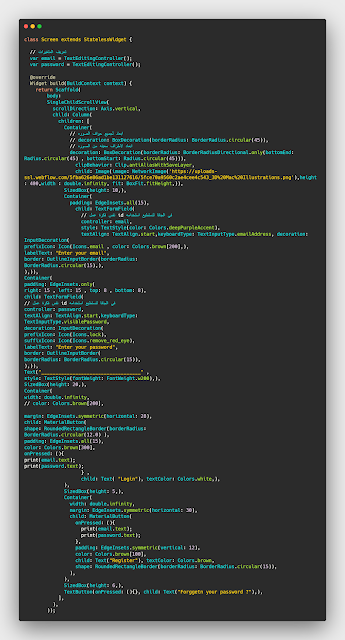
الكود الموجود بالصوره
class Screen extends StatelessWidget {

  // تعريف المتغيرات
  var email = TextEditingController();
  var password = TextEditingController();

  @override
  Widget build(BuildContext context) {
    return Scaffold(
        body:
        SingleChildScrollView(
          scrollDirection: Axis.vertical,
          child: Column(
            children: [
              Container(
                width: double.infinity,
                child: Stack(
                  alignment: Alignment.bottomCenter,
                  children: [
                   Image(image: NetworkImage('https://uploads-sl.webflow.com/5fba626e86ad1be131127616/5fce70a9560c2ae4cee4c543_3D%20Mac%20Illustrations.png'),height: 400,width : double.infinity, fit: BoxFit.fitHeight,),
                    Container(
                      padding: EdgeInsets.symmetric(vertical: 10),
                        width: double.infinity,
                        //   // اختيار اللون والشفافيه
                        color: Colors.black.withOpacity(.4),
                        //   // النص مع التعديل على بعض خصائصه
                       child: Text("LOGIN" , style: TextStyle(color: Colors.white , fontSize: 22 ),textAlign: TextAlign.center,))
                  ],

                ),
              ),
              Container(
                padding: EdgeInsets.all(15),
                  child: TextFormField(
                    // نفس فكرة عمل id في الجافا لنستطيع استخدامه
                    controller: email,
                   textAlign: TextAlign.start,keyboardType: TextInputType.emailAddress, decoration: InputDecoration(
                    prefixIcon: Icon(Icons.email),
                    hintText: "Enter your email",
                    border: OutlineInputBorder(),

                  ),)),
              Container(
                padding: EdgeInsets.only(right: 15 , left: 15 , top: 8 , bottom: 8),
                  child: TextFormField(
                    // نفس فكرة عمل id في الجافا لنستطيع استخدامه
                    controller: password,
                   textAlign: TextAlign.start,keyboardType: TextInputType.emailAddress, decoration: InputDecoration(
                    prefixIcon: Icon(Icons.lock),
                    suffixIcon: Icon(Icons.remove_red_eye),
                    hintText: "Enter your password",
                   border: OutlineInputBorder(),
                  ),)),
              SizedBox(height: 10,),
              Container(
                width: double.infinity,
                  // color: Colors.brown[200],
                  margin: EdgeInsets.symmetric(horizontal: 28),
                  child: MaterialButton(
                    shape: RoundedRectangleBorder(borderRadius:BorderRadius.circular(12.0) ),
                    padding: EdgeInsets.all(15),
                    color: Colors.brown[300],
                    onPressed: (){
                      print(email.text);
                      print(password.text);
                    } ,
                    child: Text( "Login"), textColor: Colors.white,),
              ),
              SizedBox(width: 5,),
              Row(
                mainAxisAlignment: MainAxisAlignment.center,
                children: [
                Text("You Don't have email ?"),
               TextButton(onPressed: (){}, child: Text("Register ?" , style: TextStyle(color: Colors.brown[300]),))
              ],
              ),
            ],
          ),
        ));
  }
}
تصميم واجهة login وعمل الصوره curve بداخلها
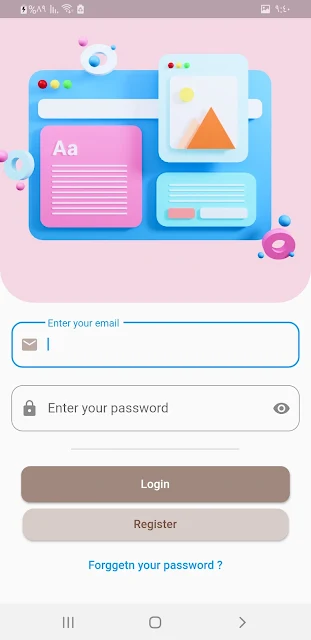
هنا سوف نستعمل صورة من الانترنت وايضا بالاعلى تم استعمال نفس الصورة ولكن هنا نريد ان نقوم بعمل شكل دائري على الحواف السفليه للصورة وكتابة عبارة login اسفلها وليس داخل الصورة ولذلك لن نحتاج الى عمل stack فقط يكفي ان تقوم بإدراج الصورة وعمل decoration وايضا سوف سوف نقوم بعمل نفس الشكل الدائري للنصوص ونغير شكل التسجيل الى زر مستطيل يشبة زر الدخول واسفلهم نص قابل للنقر بإسم هل نسيت كلمة المرور , ويمكنك ربط الزر مع صفحة اخر او Dialog .
الكود السابق كامل
  // تعريف المتغيرات
  var email = TextEditingController();
  var password = TextEditingController();

  @override
  Widget build(BuildContext context) {
    return Scaffold(
        body:
        SingleChildScrollView(
          scrollDirection: Axis.vertical,
          child: Column(
            children: [
              Container(
                // ابعاد لجميع حواف الصوره
                // decoration: BoxDecoration(borderRadius: BorderRadius.circular(45)),
                // ابعاد لاطراف معينه من الصوره
               decoration: BoxDecoration(borderRadius:BorderRadiusDirectional.only(bottomEnd: Radius.circular(45) , bottomStart: Radius.circular(45))),
                  clipBehavior: Clip.antiAliasWithSaveLayer,
                 child: Image(image: NetworkImage('https://uploads-sl.webflow.com/5fba626e86ad1be131127616/5fce70a9560c2ae4cee4c543_3D%20Mac%20Illustrations.png'),height: 400,width : double.infinity, fit: BoxFit.fitHeight,)),
              SizedBox(height: 10,),
              Container(
                padding: EdgeInsets.all(15),
                  child: TextFormField(
                    // نفس فكرة عمل id في الجافا لنستطيع استخدامه
                    controller: email,
                    style: TextStyle(color: Colors.deepPurpleAccent),
                   textAlign: TextAlign.start,keyboardType: TextInputType.emailAddress, decoration: InputDecoration(
                    prefixIcon: Icon(Icons.email , color: Colors.brown[200],),
                    labelText: "Enter your email",
                    border: OutlineInputBorder(borderRadius: BorderRadius.circular(15),),

                  ),)),
              Container(
                padding: EdgeInsets.only(right: 15 , left: 15 , top: 8 , bottom: 8),
                  child: TextFormField(
                    // نفس فكرة عمل id في الجافا لنستطيع استخدامه
                    controller: password,
                   textAlign: TextAlign.start,keyboardType: TextInputType.visiblePassword, decoration: InputDecoration(
                    prefixIcon: Icon(Icons.lock),
                    suffixIcon: Icon(Icons.remove_red_eye),
                    labelText: "Enter your password",
                    border: OutlineInputBorder(borderRadius: BorderRadius.circular(15)),

                  ),)),
             Text("___________________________________" , style: TextStyle(fontWeight: FontWeight.w200),),
              SizedBox(height: 20,),
              Container(
                width: double.infinity,
                  // color: Colors.brown[200],
                  margin: EdgeInsets.symmetric(horizontal: 28),
                  child: MaterialButton(
                    shape: RoundedRectangleBorder(borderRadius:BorderRadius.circular(12.0) ),
                    padding: EdgeInsets.all(15),
                    color: Colors.brown[300],
                    onPressed: (){
                      print(email.text);
                      print(password.text);
                    } ,
                    child: Text( "Login"), textColor: Colors.white,),
              ),
              SizedBox(height: 5,),
              Container(
                width: double.infinity,
                margin: EdgeInsets.symmetric(horizontal: 30),
                child: MaterialButton(
                  onPressed: (){
                    print(email.text);
                    print(password.text);
                  },
                  padding: EdgeInsets.symmetric(vertical: 12),
                  color: Colors.brown[100],
                  child: Text("Register"), textColor: Colors.brown,
                  shape: RoundedRectangleBorder(borderRadius: BorderRadius.circular(15)),
                ),
              ),
              SizedBox(height: 6,),
              TextButton(onPressed: (){}, child: Text("Forggetn your password ?"),),
            ],
          ),
        ));
  }
}
اذا كنت تريد ظهور كلمة السر كمجموعة من النقاط يمكنك استخدام الكود التالي لتحويل النص المدخل الى علامات ...
obscureText: true,لمزيد من المقالات في لغة فلاتر او اي لغة برمجة اخرى يمكنك مشاهدة الموقع وتتبع باقي المقالات البرمجية في الموقع
android sdk manager تحميل flutter developers applications create app android android studio mac


