كيفية عمل ListView في flutter بسهوله
الـ listview واحد من الاشياء التي لا غنى عنها في تصميم تطبيقات الاندرويد او ios وهي ببساطة عمل قائمة تحتوي على مجموعة من العناصر بداخلها ويتم تكرارها في كثير من الاحيان مثال على ذلك تطبيف الماسنجر الذي قمنا به في المقالة السابقة كان الامر يحتاج منا الى عدد كبير من الاكواد لكي تحصل في النهايه على مجموعة من العناصر والاشكال ولكن هنا الامر ابسط لاننا سوف نقوم بعمل العنصر مره واحده فقط وبعدها سوف نقوم بعملية تكراره مثل ما نريد .
اتجاه العالم في الايام المقبله كما هو موضح امامنا متجه بشكل كبير في محال البرمجيات وتطوير البرمجيات المختلفه سواء تطبيقات هواتف ذكيه او برامج سطح مكتب او حتى في مجال تطوير الاجهزه والبرمجيات التي تختص بعلم الذكاء الاصطناعي ، والاقبال ع تعلم البرمجه اصبح كبير جدا وذلك لانها تسهل على البشر الكثير من الوقت وتقدم امكانية استخدام مختلفه وخصوصا مجال تطوير وبرمجة تطبيقات الجوال وهذا ما نركز عليه في موقعنا بالشكل الكبير .
نحن تهتم في موقعنا في مساعتدكم على تعلم وتطوير تطبيقاات الاندرويد و ios باستخدام تقنية flutter وهي تقنيه حديثه مقدمه لنا من العملاق جوجل والتي تهدف وتسعى ان الى توسع علم البرمجه وتسهل على المستخدمين التعامل مع مختلف الاجهزه بلغة واحده مثل تطوير تطبيقات android , ios , embeded , desktop بلغة واحده وهذا ما يميز هذه اللغه ونسبة الوظائف بها اصبحت مطلوبه بشكل كبير عن غيرها من التقنيات ولكن في نهاية الامر هي تعد cross platform .
عمل ليست فيو في فلاتر بالعربي
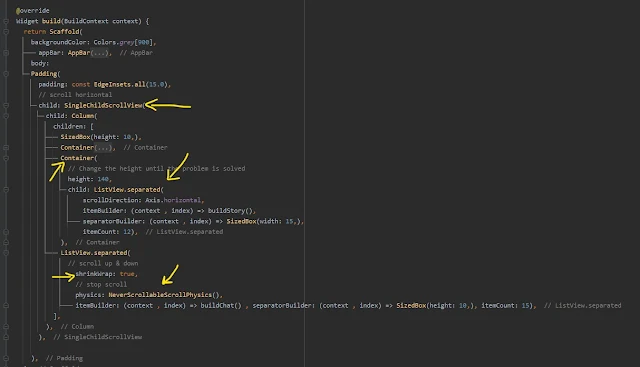
نقوم بعمل single child ونضع بداخلة listview ونحيطه container ونمرر له الاتجاه سواءراسي او افقي وبعدها الmethode التي قمنا بعمملها لتكرار العناصر واخيرا نضع عدد العناصر التي نريد ظهورها .
كود ListView في فلاتر
return Scaffold(
      backgroundColor: Colors.grey[900],
        appBar: AppBar(
          elevation: 0.0,
          backgroundColor: Colors.grey[900],
          title:
          Row(
            children: [
              CircleAvatar(
                radius: 20,
               backgroundImage: NtworkImage('https://cdn.dribbble.com/users/13754/screenshots/10514046/media/75036ca28a43caf66b984a250bd1b39b.png?compress=1&resize=400x300'),
                // backgroundImage: NetworkImage(''),
              ),
              SizedBox(width: 13,),
              Text("Chat" , style: TextStyle(fontSize: 18 , color: Colors.white),),
            ],
          ),
          actions: [
            IconButton(onPressed: (){},
                icon: CircleAvatar(
                    radius: 17,
                    backgroundColor: Colors.black,
                    child: Icon(Icons.camera_alt, color: Colors.white, size: 16,),
                )),
            IconButton(onPressed: (){},
                icon: CircleAvatar(
                    radius: 17,
                    backgroundColor: Colors.black,
                    child: Icon(Icons.edit, color: Colors.white, size: 16,),
                )),
          ],
        ),
      body:
      Padding(
        padding: const EdgeInsets.all(15.0),
        // scroll horizontal
        child: SingleChildScrollView(
          child: Column(
            children: [
              SizedBox(height: 10,),
              Container(
                padding: EdgeInsets.all(8),
               decoration: BoxDecoration(borderRadius: BorderRadius.circular(15) , color: Colors.grey[700]),
                child: Row(
                  children: [
                    Icon(Icons.search),
                    Text("search",)
                  ],
                ),
              ),
              Container(
                // Change the height until the problem is solved
                height: 140,
                child: ListView.separated(
                    scrollDirection: Axis.horizontal,
                    itemBuilder: (context , index) => buildStory(),
                    separatorBuilder: (context , index) => SizedBox(width: 15,),
                    itemCount: 12),
              ),
              ListView.separated(
                // scroll up & down
                  shrinkWrap: true,
                  // stop scroll
                  physics: NeverScrollableScrollPhysics(),
                 itemBuilder: (context , index) => buildChat() , separatorBuilder: (context , index) => SizedBox(height: 10,), itemCount: 15),
            ],
          ),
        ),

      ),
    );
  }

  Widget buildChat() => Row (
    children: [
      Stack(
        alignment: AlignmentDirectional.bottomEnd,
        children: [
          CircleAvatar(
            radius: 35,
           backgroundImage: NtworkImage('https://cdn.dribbble.com/users/13754/screenshots/10755240/media/c7b379724eb61a95018287e21f287b5e.png?compress=1&resize=400x300'),
          ),
          CircleAvatar(radius: 8, backgroundColor: Colors.green,),

        ],
      ),
      SizedBox(width: 12,),
      Expanded(
        child: Column(
          crossAxisAlignment: CrossAxisAlignment.start,
          children: [
           Text("Ahmed mahmoud" ,maxLines: 1 , overflow: TextOverflow.ellipsis ,style: TextStyle(color: Colors.white , fontWeight: FontWeight.w700 , fontSize: 18),),
            SizedBox(height: 5,),
           Text("Hello I'm ahmed mahmoud , i'm flutter Developer and you flutter developer ? sasdasd" ,maxLines: 2 , overflow: TextOverflow.ellipsis, style: TextStyle(color: Colors.white , fontWeight: FontWeight.w400 , fontSize: 11),),
          ],
        ),
      ),
      CircleAvatar(
        radius: 4,
        backgroundColor: Colors.blueAccent,
      ),
      SizedBox(width: 5,),
      Padding(
        padding: const EdgeInsetsDirectional.only(end: 5.0),
        child: Text("12 : 25 Am", style: TextStyle(color: Colors.white , fontSize: 12),),
      ),
    ],
  );

  Widget buildStory () => Container(
    width: 60,
    padding: EdgeInsets.symmetric(vertical: 15),
    child: Column(
      children: [
        Stack(
          alignment: AlignmentDirectional.bottomEnd ,
          children: [
            CircleAvatar(
              radius: 30,
             backgroundImage: NetworkImage('https://images.milledcdn.com/2020-09-07/7K4PQLg4D1D_kROF/9Pvr832Ur5nk.png'),
            ),
            CircleAvatar(
              radius: 8,
              backgroundColor: Colors.grey[900],
            ),
            CircleAvatar(
              radius: 7,
              backgroundColor: Colors.red[300],
            ),
          ],
        ),
        SizedBox(height: 5,),
        Container(
            padding: EdgeInsetsDirectional.only(start: 5),
            child: Text("Ahmed mahmoud" ,style: TextStyle(color: Colors.white) , maxLines: 2 , overflow: TextOverflow.ellipsis, )),

      ],
    ),
  );
لمزيد من الاكواد يمكنك متابعة التالي
تصميم واجهة تطبيق messanger facebook بإستخدام flutter
تصميم واجهة Login في Flutter مع شرح كيفية التصميم
ازالة علامة debugging من التطبيق في Flutter
شرح كيفية تثبيت فلاتر flutter على اندرويد ستوديو بالصور خطوه بخطوه
android sdk manager تحميل flutter developers applications create app android android studio mac


